


Albert Einstein once said, “Creativity is intelligence having fun,”– and we completely agree with that. One of the best ways to bring out the creativity in your children is by engaging them in animal crafts for kids. Animal art and crafts is not only fun for them but also helps them take a break from their studies and relax for a while. Let’s explore the best animal crafts for kids here.
Math & ELA | PreK To Grade 5
Kids see fun.
You see real learning outcomes.
Watch your kids fall in love with math & reading through our scientifically designed curriculum.
Parents, try for free Teachers, use for free
25 Best Animal Crafts For Kids
Whatever it is that you’re looking for- be it fun sock puppets, clay dough crafts or handprint crafts, you’ll find a little something in this list for sure. Let’s take a look at the best animal crafts for kids!
1. Paper Plate Hedgehog Craft
What You’ll Need: Brown paint, pencil, paintbrush, paper plates, glue, scissors
Steps-by-Step Guide:
- Draw or download a hedgehog drawing. Cut out the pieces.
- Take a paper plate, paint it brown and keep it aside to dry.
- Place the quill outline on the paper plate, trace, and cut it out. Attach the paper plate quill to the hedgehog body using glue.
- Glue the eye above and to the right of the hedgehog’s smile. Attach the pink cheek below the eye. Glue the small black nose to the tip of the hedgehog’s face.
2. Handprint Bunny Craft
What You’ll Need: Glue, glue dots, scissors, pom poms, pipe cleaners, colored cardstock, pencil, bunny template printout
Step-by-Step Guide:
- Download a bunny template and print it on colored cardstock. Cut out the pieces.
- Position the cheeks below the eyes and secure with glue.
- Trace your child’s hand onto the same colored cardstock to create two handprints. Cut them out.
- Glue the bunny’s inner ear onto one handprint and repeat for the other ear. Attach the ears to the back of the bunny’s head, aligning the fingers upward. Use a glue dot to attach a pink pom pom nose.
- For whiskers, twist three white pipe cleaners together and glue below the bunny’s nose with a glue dot. Lastly, cut the whiskers and give them the length you desire.
3. Squirrel Craft
What You’ll Need: Scissors, glue, colored cardstock and a squirrel template
Step-by-Step Guide:
- Download and print a squirrel template. Cut out all the pieces.
- Glue the top part of the squirrel’s head to the base. Attach the inner ears using glue.
- Position and glue the eyes below the arch of the squirrel’s face. Glue the nose above the mouth line. Use glue to attach the head and the body. Secure the tail to the left side of the body and head.
- Glue the left leg in front and the right leg behind the body. Place the arms above the legs and secure with glue. Add a small tooth below the mouth using glue.
4. Recycled CD Hippopotamus Craft
What You’ll Need: an old CD, magenta or purple felt, white foam, black felt, scissors, tacky glue, and a black marker.
Step-by-Step Guide:
- Clean the old CD, cut out template pieces as stencils, and use them to trace the nostrils from black felt and eyes from white foam.
- Draw the eyeballs with black markers and cut out the teeth from white foam. Cut the ears and mouth from purple felt.
- Paste the mouth onto the CD using Tacky glue or a hot glue gun. Attach the ears, position the teeth under the purple felt snout, and stick on the nostrils and eyes. Optionally, add a stick or paper straw at the back for use as a prop.
5. Foam Cup Lion Craft
What You’ll Need: Yellow paint, orange yarn, paintbrush, small foam cup, brown marker, yellow cardstock paper, googly eyes, scissors, glue
Step-by-Step Guide:
- Apply yellow paint to the foam cup and let it dry. Cut orange yarn strands and use tacky glue to create an oval shape on the cup.
- Attach the yarn pieces to the oval shape with glue. Add more glue and yarn where needed. Cut yellow cardstock into lion ears, fold and attach them to the cup.
- Glue googly eyes and use a brown marker for the nose, mouth, and whisker dots to finish the lion craft.
6. Cupcake Liner Zebra Craft
What You’ll Need: Green cardstock, black marker, scissors, glue, googly eyes, black and white cardstock paper, zebra stripe cupcake liners
Step-by-Step Guide:
- To craft the zebra, start by folding a cupcake liner into a triangle shape for the head.
- Add a black muzzle using a marker and cut slits for hair. Repeat this process for the body.
- Cut and stripe four legs from white cardstock and attach them. Glue the head to the body, add ears, a black tail, and googly eyes.
7. Paper Bag Giraffe Puppet Craft
What You’ll Need: Googly eyes, black sharpie, paper bag, glue, scissors, yellow, orange, and brown paper.
Step-by-Step Guide:
- Begin by cutting two yellow paper pieces and adhering them to each section of the paper bag.
- Cut brown rounded hearts for the spots on the giraffe’s body.
- Attach the remaining facial features, and you’re finished!
8. Potato Stamped Bear Cards
What You’ll Need: Adhesive, scissors, white and brown cardstock papers, pre-folded cardstock card, knife, raw potato, brown craft paint, wiggle eyes, paper plate, and a black marker
Step-by-Step Guide:
- To start with this, first, create your card in the shape and size of your choice. Cut a piece of white cardstock that fits the front of the card and attach it with a glue stick.
- Cut a potato in half and use one half as a stamp for the bear’s head. Apply brown craft paint to the potato half and stamp it in the center of the white cardstock.
- Let it dry completely. Cut two half-circle ears and an oval nose piece from brown cardstock paper. Use a Sharpie marker to draw a nose/mouth on the oval shape. Once the stamped design is dry, secure the paper pieces to it using a glue stick.
- Add wiggle eyes. Write a message like “love you beary much” on the front of the card using the Sharpie marker.
9. Paper Unicorn Craft
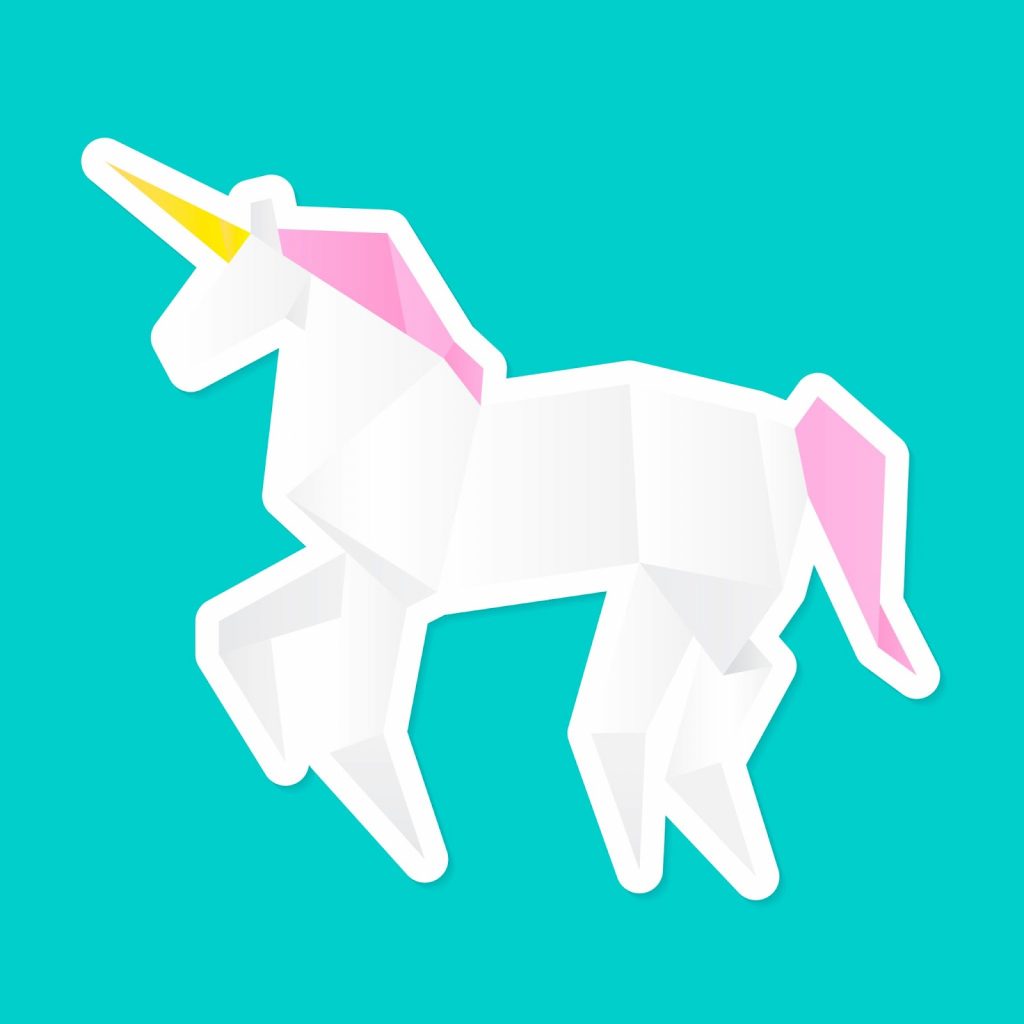
What You’ll Need: Glue, scissors, white cardstock, colored cardstock, a unicorn drawing printout
Step-by-Step Guide:
- Download and print a unicorn template. Cut out all the pieces.
- Glue the unicorn bang piece by applying glue to the bottom side of the back and positioning it on the unicorn’s head.
- Place the unicorn mane behind the head, adjusting the positioning for a seamless blend.
- Glue the unicorn horn in the center of the bangs. Apply glue to the top of the neck piece and slide it behind the head and mane, securing it in place.
10. Paper Plate & Recycled Newspaper Koala
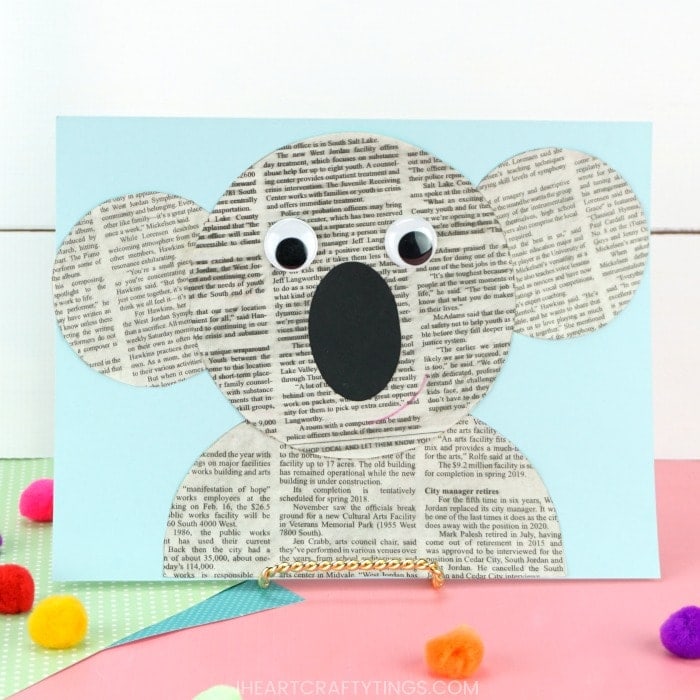
What You’ll Need: Cardstock paper, basic craft scissors, a large paper plate, a black marker, a hand-held office stapler, gray cardstock paper, school glue, white cardstock paper, and old recycled newspapers.
Step-by-Step Guide:
- First, let your child cut or tear black newspaper into small squares. Apply glue generously on the paper plate.
- Then, have the children cover the glue with tissue paper until the plate is completely covered, forming the koala’s head. While they do that, cut out koala features from cardstock, such as large ears, a big nose, and small eyes (use a black marker to add pupils).
- Attach the cardstock pieces in their designated spots using glue or staples (the ears go on the sides of the decorated paper plate).
- Finally, add any decorations you like for detailing.
11. Sun Catcher Peacock
What You’ll Need: Tissue paper, contact paper, glitter, transparent confetti, marker, scissors, printout of a peacock or a drawing of the same
Step-by-Step Guide:
- Get clear contact paper or cupboard liner. Place it sticky side up and cover it with tissue paper, transparent plastic confetti, or glitter for added decoration.
- Cut another piece of contact paper of the same size and create a sandwich with the tissue paper, ensuring there are no air bubbles. Use a permanent marker to draw the outline of a peacock tail and cut it out.
- Add embellishments such as glitter glue, permanent marker, or jewels to the tail. Make or print out the provided peacock body and attach it to the tail using foam or a paper donut. Display the peacock against a light-colored background or in a window for best effect.
12. Gandhi’s 3 Monkeys
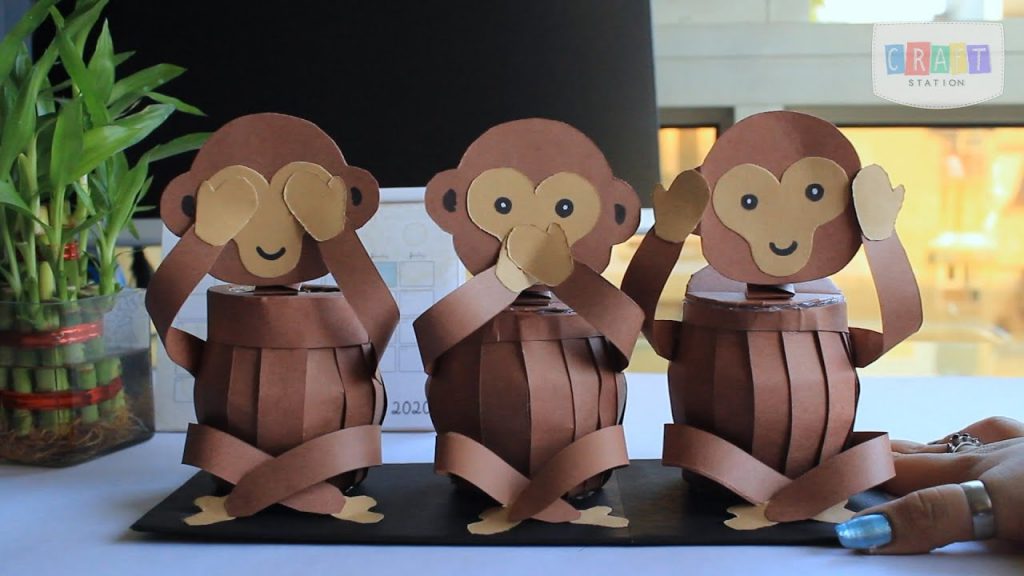
What You’ll Need: Yellow, brown, light brown and white paper, scissors, glue, black marker, staplers
Step-by-Step Guide:
- Cut the monkey body into an elongated 8 shape from dark brown paper.
- Cut strips for legs and tail, and smaller strips for ears and paws. Use light brown paper to create an oval for the face. Cut circles for eyes and draw them.
- Fold the hands and legs accordion-style. Attach paws and roll the tail into a circle.
- Stick on the mouth, ears, and eyes. Draw the mouth and nostrils with a pen.
13. Fork Print Panda Bear
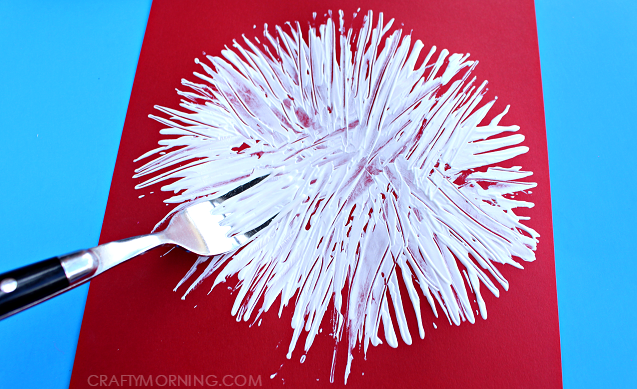
What You’ll Need: White paint, black and white paper, fork, scissors and glue
Step-by-Step Guide:
- To begin, guide the children in dipping their forks into white paint and pulling away from the center to create a round shape.
- Then, proceed to cut out ears, a nose, a mouth, and pupils to be glued onto the artwork. Allow it to dry, and voila! You’ll have the most adorable panda bear ever.
14. Footprint Monkey
What You’ll Need: Construction paper, paintbrush, paint, googly eyes
Step-by-Step Guide:
- Begin by applying brown paint to the foot, then create a footprint on a sheet of construction paper.
- On each side of the heel, make thumbprint ears. Add a tail using paint and allow it to dry.
- Once dry, use tan paint to depict the monkey’s tummy and face. Use white paint and fingerprints to form the eyes. Complete the artwork by drawing or painting on the facial features. For an extra adorable touch, consider using googly eyes.
15. Toucan Craft
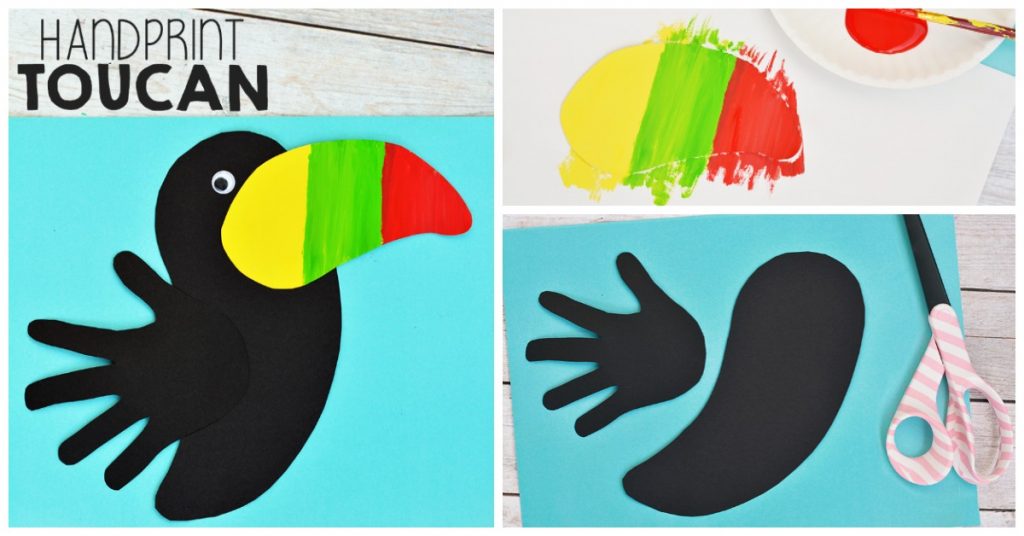
What You’ll Need: Black and brown cardstock paper, paper plate, red, green and orange plate, red and yellow tissue paper, paintbrushes, black paint, glue, scissors, googly eye, crayon
Step-by-Step Guide:
- Cut the small paper plate in half. Shape one half into a curved beak.
- Paint the other half black for the wings. Paint the beak with colors of choice. Let dry. Cut out the Toucan body, feet, and tail feathers.
- Outline the face and underbelly with white crayon and glue on crumpled tissue paper. Glue on the feet, wiggly eye, black wing, and colorful beak.
16. Polar Bear Craft
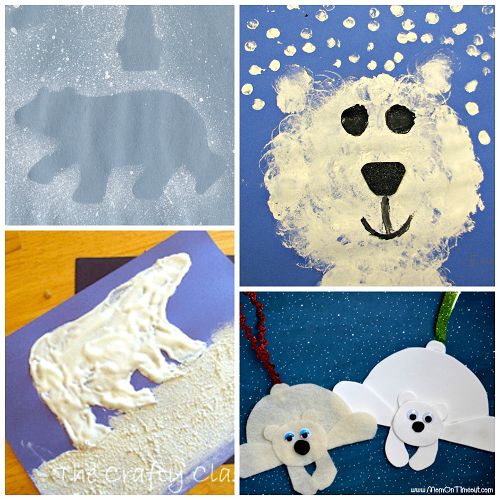
What You’ll Need: Pink and black marker, scissors, white paper plate, glue and a polar bear template
Step-by-Step Guide:
- To start with one of the best animal crafts for kids, download the Polar bear craft template and print it.
- Use the template to cut a half circle from the bottom of the plate. Use the template to draw cutting lines on the paper plate.
- Cut out the head and ear from the half circle. Attach the head to the back of the plate using tape or glue.
- Use a glue stick to attach the ear to the head. Color the inside of the ear with a pink marker and add a nose and an eye with a black marker.
17. Recycled Coffee Creamer Bottle Craft
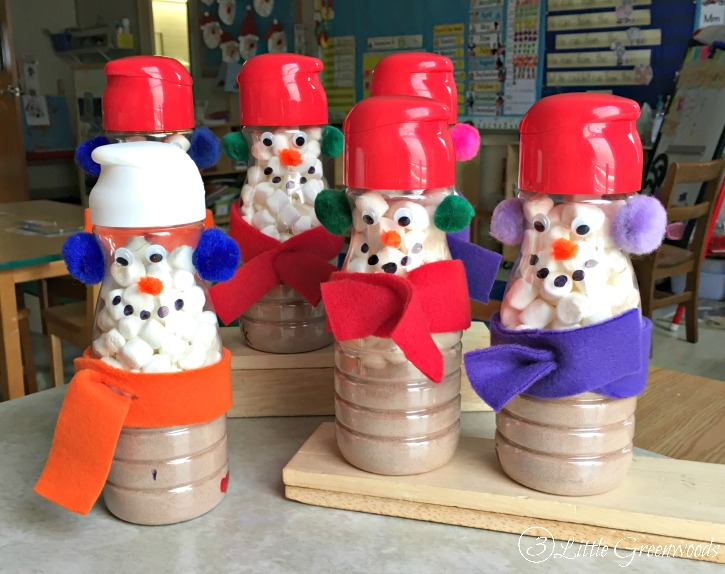
What You’ll Need: Hole punch, straw, googly eyes, empty coffee creamer bottle, black construction paper, yellow cardstock, scrapbook paper, tape and glue
Step-by-Step Guide:
- Cut a black construction paper into an 8 1/2″ square, tapering two sides. Glue one straight side just below the black bottle cap onto the white plastic.
- Create wings from the leftover black paper and attach them in the proper penguin wing position.
- Cut yellow cardstock into a square, fold one end into a point, and secure it with foam dots or tape. Make a beak opening in the yellow foam and trim it to fit on the bottle. Attach the ear and head with glue.
- Fold Valentine-themed paper accordion-style for the bow tie and use a scrap as the knot, gluing it in place. Make a double-sided heart and attach it to a drinking straw. Punch a hole in one wing and insert the heart straw.
18. Foam Cup Safari
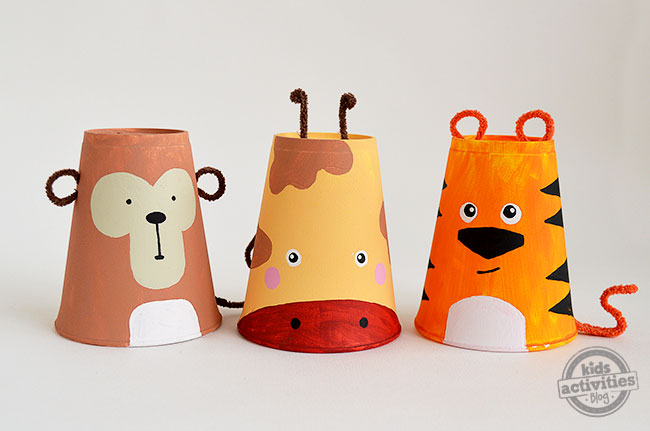
What You’ll Need: Acrylic paint, paintbrush, styrofoam cups, pipe cleaner, tape, scissors, pencil
Step-by-Step Guide:
- Place the upside-down styrofoam cups on a newspaper or mat and let the kids take over. They should paint the cup with the main base color for the animal. Acrylic paint usually needs one coat, while poster paint may require a second coat.
- After it dries, the kids can draw or paint the eyes and character details before setting it aside to dry again. While it dries, use craft scissors to cut pipe cleaners for ears and wiggly tails, as needed.
19. Flamingo Soap
What You’ll Need: Neon blue food coloring, clear glycerin soap, essential oil, skin-safe glitter, round silicone soap mold, flamingo toys, microwave-safe measuring cup, isopropyl alcohol in a spray bottle, and soap cutter
Step-by-Step Guide:
- To make the soap, start by cutting it into square cubes for proper melting. Place the soap in a microwave-safe dish and heat it in 30-second intervals, stirring in between, until completely melted.
- Add 2-3 drops of neon blue food coloring and stir well. Avoid using gel food coloring as it doesn’t mix well with the soap. Mix in a tablespoon of glitter or adjust the amount to your liking.
- Carefully pour the melted soap into a mold, filling it halfway. Spray the top and bottom of flamingo toys with isopropyl alcohol and place them on the melted soap before it hardens to ensure attachment. Spray the top of the soaps again to remove any bubbles.
- Leave the soap for at least 4 hours or overnight to harden. Gently press the back of the silicone mold to release the airlock and remove the hardened soaps. Cover any unused soaps with plastic wrap or place them in plastic bags for gifting.
20. Pipecleaner Feather Peacock
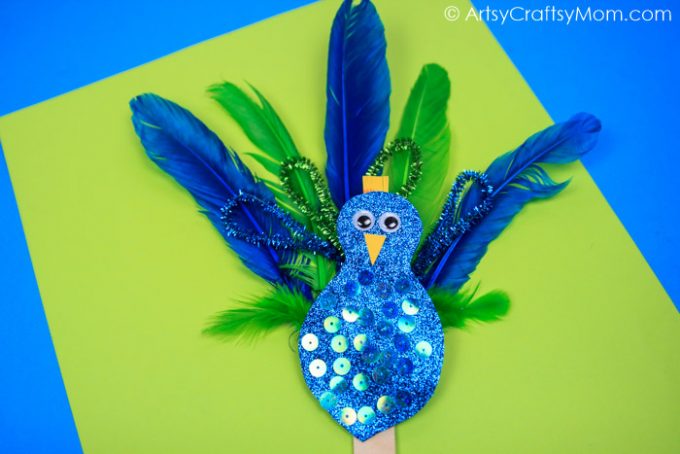
What You’ll Need: Blue sequin, tinsel pipe cleaners (glittery green and blue), blue glitter paper, blue and green long feathers, yellow paper, googly eyes, scissors, craft stick, glue gun
Step-by-Step Guide:
- Assemble the big feathers in a fan-like structure, using 4 blue and 2 green feathers. They will be attached to a craft stick with a hot glue gun.
- The glittery pipe cleaner feathers, 2 blue and 2 green, have to be folded into leaf shapes and placed alternately on top of the big feathers.
- Make the peacock body from blue glitter paper in a bowling pin shape and secured with glue.
- Add a foam beak and crest, along with googly eyes and eyelashes and glue the colored sequins onto the body. Finally, attach the feathers to the peacock body.
21. Torn Paper Panda
What You’ll Need: Blue and green cardstock, black and white construction paper, water, glue, scissors, q tips
Step-by-Step Guide:
- To create a panda, dampen a q-tip with water and use it to “draw” the desired shape on construction paper. Trace it multiple times, especially on thinner, cheaper paper, as it tears easily along the wet line.
- Repeat this technique for all body parts: a white body, black legs, arms, ears, eyes, and nose. Fold a small portion of the arms and legs, apply glue to the folded part, and attach them behind the panda.
- Glue the eyes and nose in place. Glue the panda’s body onto blue cardstock and affix the ears. Cut bamboo shapes from green cardstock and glue them onto the panda.
22. Cardboard Tube Coiled Snakes
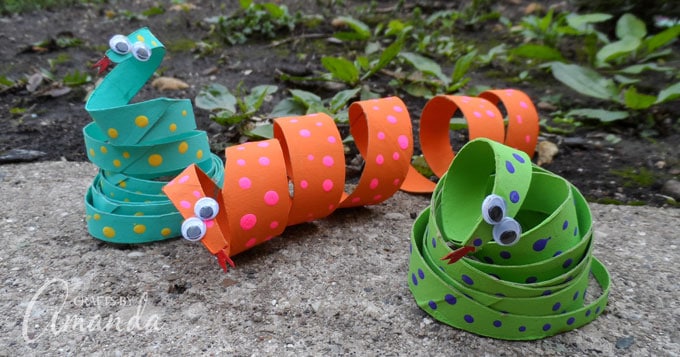
What You’ll Need: Googly eyes, glue, scissors, tube from wrapping paper, cardboard tubes (at least 3), toothpick, acrylic craft paint
Step-by-Step Guide:
- Paint both sides of the cardboard tubes, applying a second coat if needed. Cut the tubes into coils, being mindful of any dampness.
- Wrap the cut cardboard loosely around a tube, adding polka dots with a contrasting paint color. Let this dry and then repeat on the other side as well.
- Remove from the tube and shape the painted cardboard into coils. Paint one end red and let it dry.
- Glue on googly eyes and snip the red end into a forked tongue. Alternatively, use a paper tongue if preferred. Once dry, manipulate and shape the tubes as desired. Have fun with your creations!
23. Camel Egg Carton Craft
What You’ll Need: Brown marker, aluminum foil ball, cardboard egg carton, masking tape, wiggly eyes, wool
Step-by-Step Guide:
- Cut a two-cup strip and a single cup from the egg carton. Use four lid strips for the legs, leaving some lip for the feet.
- Cut the carton lid for the camel’s neck, including a lump for the head. Place aluminum foil in the back cup for balance.
- Tape the pieces together: neck to two cups, other end of the neck to the single cup, and legs to the two-cup section. Paint the camel brown, glue on wiggly eyes, and add a wool tail.
24. 3D Goldfish Bowl
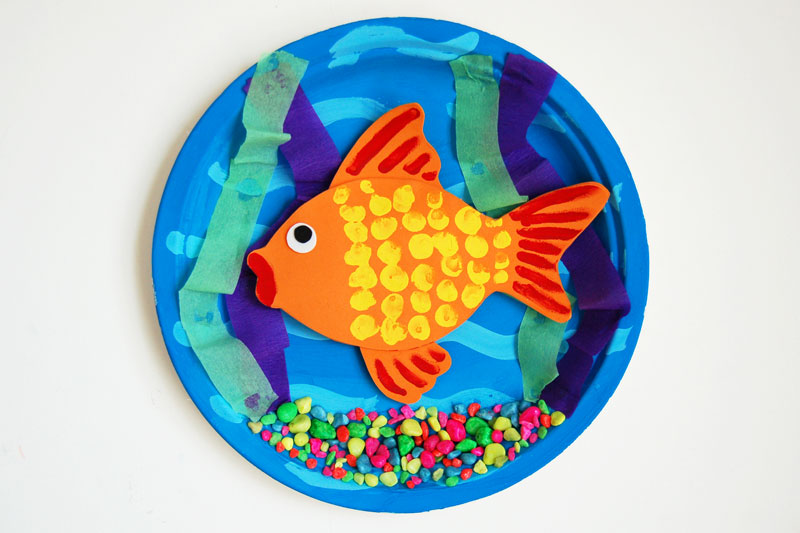
What You’ll Need: Paper plate, poster paint, craft foam, paintbrush, cotton, wiggle eye, small colored pebbles, green and purple crepe paper, glue
Step-by-Step Guide:
- Transform a paper plate into a fishbowl by painting it blue, with waves in a different shade of blue. Let the paint dry. Craft two foam fish.
- Cut out matching fish shapes from craft foam, one with fins and the other without. Apply glue on one fish and glue the matching fish on top, leaving a small opening to stuff the fish later.
- Decorate the paper plate by gluing sand or pebbles at the bottom and adding seaweed made of green and purple crepe paper. Stuff the fish with cotton and seal the opening with glue.
- Decorate the fish with a wiggle eye, patterns drawn with markers or paint, and glue it to the center of the paper plate fishbowl.
25. Animal Bean Bags
What You’ll Need: Foam, rice, pompom, cotton, scissors, pencil, wiggle eyes, glue, glue gun, letter size paper
Step-by-Step Guide:
- Print the chosen animal bean bag template on A4 or Letter size paper. Cut out and trace onto craft foam. Cut the foam pieces. Prepare the ears as instructed. Attach the ears securely.
- Add leg details if desired. Glue legs and tail to the bottom body piece.
- Apply hot glue to the edges, leaving an opening. Join top and bottom pieces.
- Decorate with craft foam shapes. Fill with beans or rice, and seal the opening. Add eyes, nose, and other details. Consider sewing for sturdiness.
26. Baby Birds in a Nest
What You’ll Need: Paper plates, poster paint, pompoms, wiggle eyes, foam, scissors, glue, paintbrush, paper shreds, or brown crepe paper
Step-by-Step Guide:
- For the nest, paint a paper plate or bowl with brown tempera paint and let it dry.
- Create baby birds using large pompoms and glue wiggle eyes onto each. Make a beak by cutting small triangles from orange craft foam or construction paper. Glue the beaks onto the pompoms.
- Attach eyes and beaks to all the pompoms. Once dry, apply glue around the edges of the paper plate or bowl. Add nesting material like paper shreds, raffia, or brown crepe paper to cover the edges. Place baby birds in the center of the nest.
Related Reading: 10-Minute Best Crafts for Kids to Make at Home
Conclusion
“Every child is an artist. The problem is how to remain an artist once we grow up.- Pablo Picasso”
Animal crafts for kids provide a wonderful opportunity for creativity and learning. Engaging in hands-on activities like creating paper plate animals, making bean bag friends, or crafting a fish bowl fosters imagination, fine motor skills, and cognitive development. According to a study conducted by national Endowment for the Arts, participation in art and craft activities has been linked to improved problem-solving abilities, enhanced visual-spatial skills, and increased self-confidence among children. By encouraging children to explore their artistic abilities through animal crafts ideas, we not only nurture their artistic talents but also promote holistic development. So let’s dive into the world of animal crafts for kids and watch their imaginations soar!
Frequently Asked Questions (FAQs)
What are some easy animal crafts for kids?
Simple animal crafts for kids include paper plate masks, toilet paper roll animals, and handprint animals.
Can these animal crafts be done independently by kids or do they require adult supervision?
Many of the animal crafts can be done independently by kids, especially those for older age groups. However, younger children may require adult supervision or assistance with cutting, handling small materials, or using certain tools like a hot glue gun.
What are some of the best animals craft for preschool kids?
The best animal crafts for preschool kids could include making foam animal puppets, creating colorful paper bag animals, and doing fingerprint art to make animal shapes.

")


